1911Forum banner

Polishing To A Mirror Finish?

12K views 121 replies 30 participants last post by  Jim2527  
#1 · (Edited)
Hi all! I joined here a while back, but was never active. I’ve been posting in another forum about some of my personal projects. I’m not a business, so I can not do this for you, but am willing to answer any questions that you may have if you are going to do this.
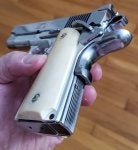
In a nutshell, once I sand off any exterior finish (using 250 or 500 grit), I then continue with 500, 1000 and sometimes up to 1200. I stone, file, dremel any burs, casting marks, boogers, etc. If anodized, such as an alloy frame, I sand past that. I remove any and all scratches. Many would be satisfied at this point, as the gun looks pretty shiny, or can continue to higher grits or the cream polishes to get it even shinier. But, you will not get a true mirror polish (as shown in the pics) without then taking it to the buffing wheel. Sometimes, I go to the buffing wheel and realize that there are still scratches. If so, it’s back to the 500 and then 1000 grit. On the buffing wheel, I keep dedicated wheels for the black rouge and the green rouge. I finish up with one of the loose cloth wheels. These guns are being done as safe queens that may get shot, but rarely. I would not recommend this for a carry gun, although the Sig P238 you see (polished flats on the slide only) was carried for a while in a pocket holster. This type of finish shows every fingerprint, humidity, etc. and can show a tiny scratch well. Plan to freshen one up if you plan to carry.
Attached are 2 completed one’s (Kahr K9, Springfield Armory CCO 1911), an “in progress” Sig 229 and various parts of others in the middle of being shined up.

Image

Image

Image

Image

Image
Image
Image
Image
Image
Image
 
#6 ·
  • Like
Reactions: BirdsThaWord
#4 ·
I'll continue to post up as I go. I currently have 6 projects in various states. I recently decided to focus on 1 at a time, which is currently the Springfield Armory V10 you see in some of those pics. I will post progress on it when I get some. I'll then get into one of the others and continue posting it's progress as well. Let me know if you have any questions about doing this to yours! 😊
 
#114 · (Edited)
This so much reminds me of a dear departed riding buddy that would go buy a very nice stainless gun at the gun shop, and before even shooting it, to the grinder and buffer it went, always coming out perfect. He was a lifelong body man and painter, and knew what he was doing. He just had an eye for what looked good, without being gaudy. He influenced me greatly.

Bravo on your work.
 
#7 ·
jj, I take it you mean the Sig? Yes, other than slide wear, it is/was in amazing shape when I got it. The frame is close to imacculate, otherwise It would be going shiny too. Keeping the frame black and doing a 2 tone is something different for me.
 
#11 · (Edited)
Hi Mike, I don't put anything on them as I don't do carbon steel guns. I only mess with stainless. Either a stainless slide & frame, or a stainless slide and alloy frame. The one with the ivory grips was done years ago and still looks like it does in the pics. It has been fondled often, but to the range only twice. I replace the grips when taking it to the range as the ivory is old and too valuable to risk it.
 
#19 · (Edited)
That is one of the tuffest parts on the frame to sand through. When you get to the edge of the dust cover, the grip area, the safety area, the trigger guard flats close to the frame…NIGHTMARE! Sand, sand, sand. Takes FOREVER.
BUT, I‘ve watched a few videos lately where guys are using Draino or oven cleaner to strip the anaodizing. Next time I do one I am going to give that a shot. The Draino method seemed to work best.
Here’s the vids I watched:
 
#15 ·
I have put a high polish on a few of my stainless pistols & give them a couple coats of Renaissance Wax to seal them up & it helps with fingerprints too. They do take a bit of maintenance if your doing more than handling them with white gloves as every little ding or scratch really stands out but can usually be buffed out pretty easily.
 
#22 · (Edited)
Lol! I thought it would be funny to pimp out one of the cheapest guns on the planet. Let me tell you though, it was rough. Since everything is “investment” cast, there were pockets and bubbles, etc in the metal underneath that coating. No matter how much I would sand, file, etc you can’t rid it of everything. As soon as you rid it of one, you uncover and expose another. The factory finish on those is crazy too. I think they dipped them in hot glue and then rolled them around in fine sand.😆
Image

Image

Image

Image

Image
 
#17 ·
Nice work. Not my cup of tea, but whatever trips your trigger. 😉
 
  • Like
Reactions: BirdsThaWord
#28 ·
Beautiful results! On stainless steel that’s awesome. However, I would be concerned with any anodized gun part: “The anodized oxide layer acts as a barrier to protect the aluminum better from corrosion and wear compared to aluminum’s natural oxide.”
 
#29 · (Edited)
Thanks! Very legitimate concern. Since the intended purpose of these guns are primarily for fondling and to make my safe heavier, I think I’m ok. The CCO I show in the 1st pic was done years back. I’ve taken it to the range twice since (I remove the ivory’s) and have fondled it more than is mentally healthy, but it still looks like it does in that pic, which was taken just after completion. I would not do this to a carry gun or a gun that I intend to shoot often.
I kinda liken these to the guy that builds a hot rod with a huge, blown race like motor, only to trailer it to shows, or tool around on a cruise in. He’ll never run it down the quarter, but prob could if he so desired.
 
#30 ·
That's some beautiful work! I'd like to get some of my pistols mirror polished. I tried contacting Patriot Polish a few times by e-mail with no response. I did try and hand polish a couple of my hand guns. I don't have the polishing wheel, so I couldn't get anywhere near mirror polish. I like stainless steel, but, that matte finish not so much.

Here's my S&W 657 that I hand polished. No mirror polish, but, looks better than the original matte finish.
Image

My DW stainless steel Specialist Commander 10mm that had the matte finish. I polished this by hand.
Image
 
#31 ·
That's some beautiful work! I'd like to get some of my pistols mirror polished. I tried contacting Patriot Polish a few times by e-mail with no response. I did try and hand polish a couple of my hand guns. I don't have the polishing wheel, so I couldn't get anywhere near mirror polish. I like stainless steel, but, that matte finish not so much.

Here's my S&W 657 that I hand polished. No mirror polish, but, looks better than the original matte finish.
View attachment 708564
My DW stainless steel Specialist Commander 10mm that had the matte finish. I polished this by hand.
View attachment 708565
For doing it by hand, those look GREAT! Sorry to hear about the experience with Patriot. I’ve said to others, based in zooming into pics they post, that they are the only one’s who do it right. Down right immaculate. I’ve zoomed in on other supposedly pro “mirror polished” jobs and found lot’s of slackery. I know from experience where the toughest spots are to get smooth/remove anodizing, and see that they gave up in those areas. Heck, I sometimes have 6, 7 or even more hours into a hammer, beavertail, etc. There’s a V10 “mirror polished” on GB right now. Asking thousands. Zoom in and I see anodizing left in multiple areas. I would be upset if I bought that gun.
Man, I wish I had your DW! I went through a wheel gun phase and would still love to have that Smith, but that DW has me drooling!
 
#32 ·
I caught the polishing bug a few years ago.

I bought a Charter Arms Southpaw that was laughably rough. All the internals needed to be finished since they had ridges from stamping. It was pink- my buddy called it the stripper gun- so I planned on refinishing it anyway. After filing and stoning and polishing the internals, I did the cylinder, hammer and trigger as well.

Image


I then did the slide on a Bersa.

Image


Laying on my kitchen counter in pieces is a 3" Ruger Security Six. I am about halfway through the 800 grit stage.

Image


As stated, it takes forever to do it right. The two junkers above are good enough but looking closely, they are still very rough. I want the Ruger to be perfect so I am taking my time. Bright light and 2.5x magnifiers really show the flaws.

So its sand, sand, sand. Polish and examine. Then sand some more.

I am trying to decide what to do with the hammer and trigger. I am thinking about blueing them for a nice contrast but can't find any pictures to see how it would look. The sights and top rib are black so it may look good.

I have plenty of time to think about it. At the rate I am moving, this should be done sometime in 2037.
 
#33 ·
Great job Eddie! Those look fantastic! Based on the description of it’s former appearance & condition, you knocked it outta the park on that Charter.
Understand what you mean about the Ruger. I have gotten more detailed and more patient over the years with these. I want the current one and following one’s to be perfect. Lol about the 2037 comment. I have a renewed vigor on these lately, but at one point it would take a few years start to finish.
 
#34 ·
Renaissance Wax is good stuff, I use it on metal/blades, wood grips/handles, & it works great as a leather preservative too. A bit hard to buff off sometimes once it dries but not bad.
Here's one of mine that's polished up pretty good, it's been done over a period of time just going over it with Flitz & microfiber cloth for a while every time I clean it.
Image
 
#36 ·
Renaissance Wax is good stuff, I use it on metal/blades, wood grips/handles, & it works great as a leather preservative too. A bit hard to buff off sometimes once it dries but not bad.
Here's one of mine that's polished up pretty good, it's been done over a period of time just going over it with Flitz & microfiber cloth for a while every time I clean it.
Image
Oooh! Likey! Hope to give an Alaskan a wirl one day.Had a 454 Raging Bull one time. LOVED the recoil. Put’s a big ol smile on yer face. 😀
 
#44 · (Edited)
In some areas, you can’t escape the tedious part. I have used a popsicle stick as well as a wooden coffee stirring stick from WaWa (slide serrations, breach face, extractor). Sometimes I’ve used an eraser on the end of a pencil, blocks of wood, small rectangular stones, sandpaper folded over a thin bladed putty knife, wrapped around the end of a wooden dowel. When using something like the putty knife, or even a flat headed screwdriver, you just have to go easy on the pressure so that you don’t push them through the sandpaper. You can paper tape up (couple of layers) something like that before you fold your sandpaper over it, just as an added precaution. In most difficult areas though, I just fold the sandpaper into really small squares and work it with my finger tips. Sometimes, turning the piece and trying to go at it from a different angle can help. To get in between serrations on a hammer, safety, slide stop or msh I will first vigourously brush them with a small (toothbrush sized) fine stainless brush, followed up by working folded sandpaper back and forth in there. I make sure to vary how I lean it so that I get both sides of the “valley” if you would of each serration. Just keep redoing your little fold, maybe 1/16ths over each time as you wear the sandpaper. I’m frugal, so once I think I’ve worn out a piece of sandpaper, I’ll unfold it and work the whole piece over a large area on the slide or frame to make sure I’m getting everything out of it. I ranted a bit. Hope some of what I said helps!
 
#42 ·
One heck of an introductory splash!!! Great work.

I’ll second its not my cup of tea. BUT…the work is good. I can appreciate the effort reahired. And thank you for mentioning times to redo a finish…now I know I am not that challenged blending a pistol. Good Luck!!!
 
  • Like
Reactions: BirdsThaWord